Tutorials
Next, we are going to apply the Basic 3D video effect to the title clip that was just placed on the Timeline.
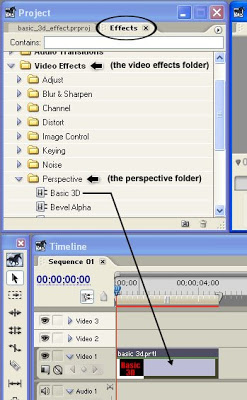
Go to the Effects window (choose Window > Effects from the main menu if you do not see it). You will find the Basic 3D video effect under Video Effects > Perspective. Once you find it, click and drag it down onto the basic_3D title clip on the Video 1 track of your Timeline in order to apply the video effect.
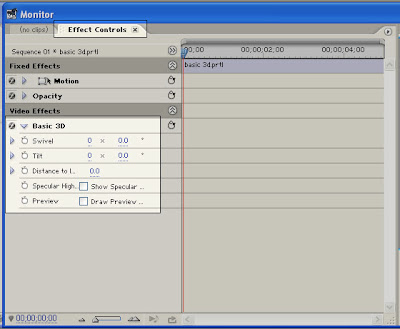
Make sure that your title clip is still selected, then go to the Effect Controls window (choose Window > Effect Controls if you do not see it). You should be able to see Basic 3D under Video Effects. Click the right-facing arrowhead beside the word Basic 3D in order to see the effect's properties. You will see 5 items: Swivel, Tilt, Distance to Image, Specular Highlight and Preview.
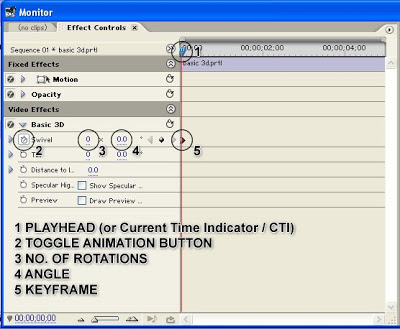
Let's work with the Swivel property first. The Swivel property controls the clips horizontal rotation. It has two values that you can work with: the number of rotations and the rotation angle.
Make sure that the title clip on your Timeline is still selected. Then in the Effect Controls window, drag the playhead to the leftmost edge of the clip's timeline. Then click on the Toggle Animation button beside the word Swivel (it's the icon that looks like a stopwatch). This will turn on keyframing for the Swivel property and will automatically add one keyframe to where the playhead is positioned.
Then move the playhead forward by about 1 second and add another keyframe by clicking on the Add Keyframe button. Keep the playhead over that keyframe and change the Swivel property's angle value. The angle value is the one to the right of the x. Right now, it should be 0.0. Click on it and input a value of 80.
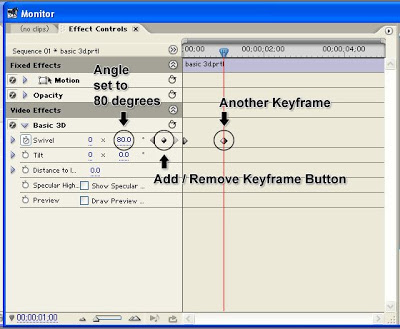
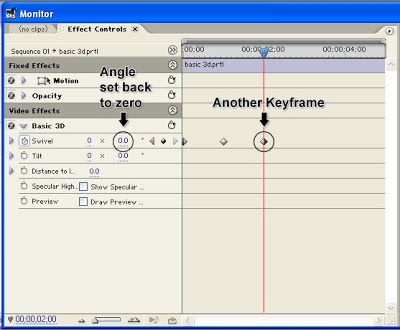
Then move the playhead forward once again by about 1 second and add another keyframe. On this keyframe, change the Swivel property's angle back to zero.
By now, if you play your movie on the program monitor, you should have something like this:
go back to Working with Adobe Premiere Pro's Basic 3D Video Effect PART 1
continue to Working with Adobe Premiere Pro's Basic 3D Video Effect PART 3
- Working With Adobe Premiere Pro's Basic 3d Video Effect Part 5
In the last part of this tutorial, we are going to add the spotlight effect that you may have noticed in the preview video from the first part of this exercise. Let's take another look. As the text tilts and swivels, you should see a glare that moves...
- Working With Adobe Premiere Pro's Basic 3d Video Effect Part 4
We will now be working with the Distance to Image property of the Basic 3D video effect. The higher the value that you assign to this property, the further away the image will appear. Make sure that the clip on the Timeline is still selected. And in the...
- Working With Adobe Premiere Pro's Basic 3d Video Effect Part 1
Level: Basic Software: Adobe Premiere Pro Version: 1.5 In this tutorial we will learn how to use Adobe Premiere Pro's Basic 3D video effect. Here's a sample video file that shows what we hope to achieve by the end of this exercise: Let's...
- Motion Effects: Keyframing The Rotation Property Part 3
Next, we will add a third keyframe. Starting from the second keyframe, we will set it so that the "rotate me" text will rotate three more times until it reaches the third keyframe. You will probably assume that you just need to input a value of 3x0.0...
- Motion Effects: Keyframing The Rotation Property Part 2
Make sure that the title clip on the Timeline is selected then go to the Effect Controls Panel. If you do not see the Effect Controls Panel, choose Window > Effect Controls from the main menu. Expand the Motion Category by clicking on the right-pointing...
Tutorials
Working with Adobe Premiere Pro's Basic 3D Video Effect PART 2
Next, we are going to apply the Basic 3D video effect to the title clip that was just placed on the Timeline.
Go to the Effects window (choose Window > Effects from the main menu if you do not see it). You will find the Basic 3D video effect under Video Effects > Perspective. Once you find it, click and drag it down onto the basic_3D title clip on the Video 1 track of your Timeline in order to apply the video effect.
Make sure that your title clip is still selected, then go to the Effect Controls window (choose Window > Effect Controls if you do not see it). You should be able to see Basic 3D under Video Effects. Click the right-facing arrowhead beside the word Basic 3D in order to see the effect's properties. You will see 5 items: Swivel, Tilt, Distance to Image, Specular Highlight and Preview.
Let's work with the Swivel property first. The Swivel property controls the clips horizontal rotation. It has two values that you can work with: the number of rotations and the rotation angle.
Make sure that the title clip on your Timeline is still selected. Then in the Effect Controls window, drag the playhead to the leftmost edge of the clip's timeline. Then click on the Toggle Animation button beside the word Swivel (it's the icon that looks like a stopwatch). This will turn on keyframing for the Swivel property and will automatically add one keyframe to where the playhead is positioned.
Then move the playhead forward by about 1 second and add another keyframe by clicking on the Add Keyframe button. Keep the playhead over that keyframe and change the Swivel property's angle value. The angle value is the one to the right of the x. Right now, it should be 0.0. Click on it and input a value of 80.
Then move the playhead forward once again by about 1 second and add another keyframe. On this keyframe, change the Swivel property's angle back to zero.
By now, if you play your movie on the program monitor, you should have something like this:
go back to Working with Adobe Premiere Pro's Basic 3D Video Effect PART 1
continue to Working with Adobe Premiere Pro's Basic 3D Video Effect PART 3
- Working With Adobe Premiere Pro's Basic 3d Video Effect Part 5
In the last part of this tutorial, we are going to add the spotlight effect that you may have noticed in the preview video from the first part of this exercise. Let's take another look. As the text tilts and swivels, you should see a glare that moves...
- Working With Adobe Premiere Pro's Basic 3d Video Effect Part 4
We will now be working with the Distance to Image property of the Basic 3D video effect. The higher the value that you assign to this property, the further away the image will appear. Make sure that the clip on the Timeline is still selected. And in the...
- Working With Adobe Premiere Pro's Basic 3d Video Effect Part 1
Level: Basic Software: Adobe Premiere Pro Version: 1.5 In this tutorial we will learn how to use Adobe Premiere Pro's Basic 3D video effect. Here's a sample video file that shows what we hope to achieve by the end of this exercise: Let's...
- Motion Effects: Keyframing The Rotation Property Part 3
Next, we will add a third keyframe. Starting from the second keyframe, we will set it so that the "rotate me" text will rotate three more times until it reaches the third keyframe. You will probably assume that you just need to input a value of 3x0.0...
- Motion Effects: Keyframing The Rotation Property Part 2
Make sure that the title clip on the Timeline is selected then go to the Effect Controls Panel. If you do not see the Effect Controls Panel, choose Window > Effect Controls from the main menu. Expand the Motion Category by clicking on the right-pointing...