Tutorials
In the last part of this tutorial, we are going to add the spotlight effect that you may have noticed in the preview video from the first part of this exercise. Let's take another look. As the text tilts and swivels, you should see a glare that moves on its surface:
Let's now learn how to add that effect.
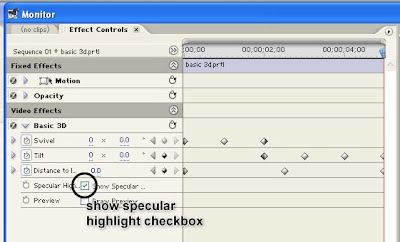
Make sure that the "Basic 3D" title clip on the Timeline is still selected. Then in the Effect Controls window, make sure that the Show Specular Highlight property of the Basic 3D video effect is checked. This will add that spotlight effect you saw in the preview above.

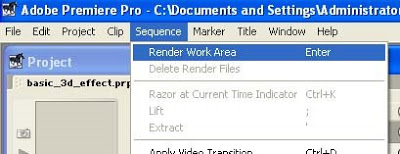
To be able to preview the Specular Highlight, you will need to render your sequence. Choose Sequence > Render Work Area from the main menu in order to render a preview.

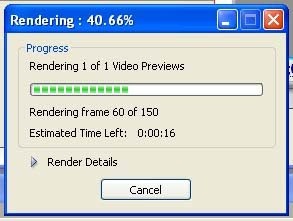
Then just wait for Premiere to finish rendering.

Once rendering is finished, you should be able to view your sequence in the Program view of the Monitor window and see the specular highlight applied.
And that concludes this tutorial on Working with Adobe Premiere Pro's Basic 3D Video Effect.
go back to Working with Adobe Premiere Pro's Basic 3D Video Effect PART 4
- Distance Learning - Cs175 A - Sem 01 Sy 2012-13
July 24, 2012 Today, we'll start with Adobe Premiere Pro CS5. This is Adobe's popular video editing software. Video editing is the process of making changes to a single video clip or multiple video clips. This could be something as simple as shortening...
- Adobe Premiere Pro 1.5 Essentials
I've created a few introductory tutorials on how to get started with Adobe Premiere Pro 1.5. I will be adding more videos to the list. 01 Creating a new Adobe Premiere Pro Project02 About the Source View in Adobe Premiere Pro 1.5's Monitor Window03...
- Working With Adobe Premiere Pro's Basic 3d Video Effect Part 4
We will now be working with the Distance to Image property of the Basic 3D video effect. The higher the value that you assign to this property, the further away the image will appear. Make sure that the clip on the Timeline is still selected. And in the...
- Working With Adobe Premiere Pro's Basic 3d Video Effect Part 3
We will now be working with the Tilt property of the Basic 3D video effect. The Tilt property controls the clip's vertical rotation. Make sure that the clip on the Timeline is still selected. Then go the the Effect Controls window and position the...
- Working With Adobe Premiere Pro's Basic 3d Video Effect Part 1
Level: Basic Software: Adobe Premiere Pro Version: 1.5 In this tutorial we will learn how to use Adobe Premiere Pro's Basic 3D video effect. Here's a sample video file that shows what we hope to achieve by the end of this exercise: Let's...
Tutorials
Working with Adobe Premiere Pro's Basic 3D Video Effect PART 5
In the last part of this tutorial, we are going to add the spotlight effect that you may have noticed in the preview video from the first part of this exercise. Let's take another look. As the text tilts and swivels, you should see a glare that moves on its surface:
Let's now learn how to add that effect.
Make sure that the "Basic 3D" title clip on the Timeline is still selected. Then in the Effect Controls window, make sure that the Show Specular Highlight property of the Basic 3D video effect is checked. This will add that spotlight effect you saw in the preview above.

To be able to preview the Specular Highlight, you will need to render your sequence. Choose Sequence > Render Work Area from the main menu in order to render a preview.

Then just wait for Premiere to finish rendering.

Once rendering is finished, you should be able to view your sequence in the Program view of the Monitor window and see the specular highlight applied.
And that concludes this tutorial on Working with Adobe Premiere Pro's Basic 3D Video Effect.
go back to Working with Adobe Premiere Pro's Basic 3D Video Effect PART 4
- Distance Learning - Cs175 A - Sem 01 Sy 2012-13
July 24, 2012 Today, we'll start with Adobe Premiere Pro CS5. This is Adobe's popular video editing software. Video editing is the process of making changes to a single video clip or multiple video clips. This could be something as simple as shortening...
- Adobe Premiere Pro 1.5 Essentials
I've created a few introductory tutorials on how to get started with Adobe Premiere Pro 1.5. I will be adding more videos to the list. 01 Creating a new Adobe Premiere Pro Project02 About the Source View in Adobe Premiere Pro 1.5's Monitor Window03...
- Working With Adobe Premiere Pro's Basic 3d Video Effect Part 4
We will now be working with the Distance to Image property of the Basic 3D video effect. The higher the value that you assign to this property, the further away the image will appear. Make sure that the clip on the Timeline is still selected. And in the...
- Working With Adobe Premiere Pro's Basic 3d Video Effect Part 3
We will now be working with the Tilt property of the Basic 3D video effect. The Tilt property controls the clip's vertical rotation. Make sure that the clip on the Timeline is still selected. Then go the the Effect Controls window and position the...
- Working With Adobe Premiere Pro's Basic 3d Video Effect Part 1
Level: Basic Software: Adobe Premiere Pro Version: 1.5 In this tutorial we will learn how to use Adobe Premiere Pro's Basic 3D video effect. Here's a sample video file that shows what we hope to achieve by the end of this exercise: Let's...
