Tutorials
We will now be working with the Tilt property of the Basic 3D video effect. The Tilt property controls the clip's vertical rotation.
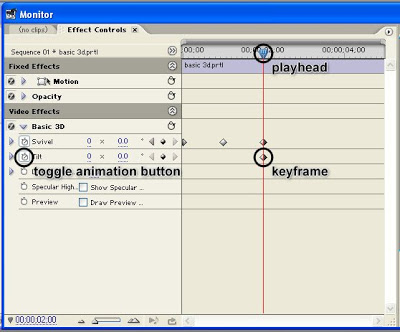
Make sure that the clip on the Timeline is still selected. Then go the the Effect Controls window and position the playhead on the same point as the third keyframe of the Swivel property. Then click on the Toggle Animation button beside the word Tilt to turn on keyframing for the Tilt property. Leave the Tilt values on this keyframe at 0 x 0.0.

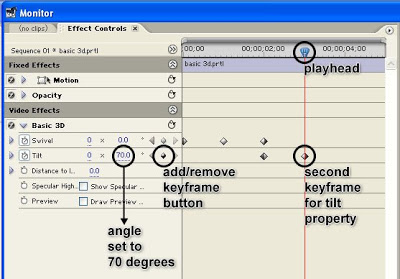
Then move the playhead forward by about 1 second and add another keyframe. On this keyframe, change the angle value to 70.

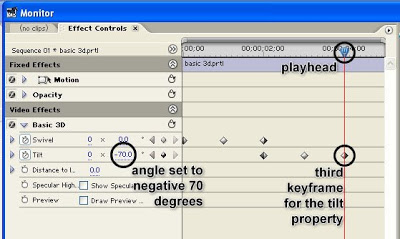
Move the playhead forward again by about 1 second and add another keyframe. Let's make the text rotate vertically towards the opposite direction. In the previous keyframe, the angle was set to 70 degrees. If we input a lower value on this next keyframe, the clip will rotate towards the opposite direction. We can even input a negative value. So let's go ahead and do that. On this new keyframe, change the angle to -70. This will result in the text rotating in the opposite direction starting from the previous keyframe.

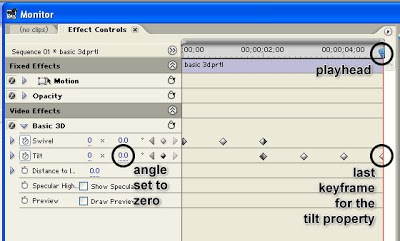
Let's add one last keyframe for the Tilt property. Position the playhead on the rightmost edge of the clip's timeline and add a keyframe. On this keyframe, change the tilt angle value back to zero.

At this point, when you watch your sequence on the program monitor, you should have something like this:
go back to Working with Adobe Premiere Pro's Basic 3D Video Effect PART 2
continue to Working with Adobe Premiere Pro's Basic 3D Video Effect PART 4
- Distance Learning - Cs175 A - Sem 01 Sy 2012-13
July 24, 2012 Today, we'll start with Adobe Premiere Pro CS5. This is Adobe's popular video editing software. Video editing is the process of making changes to a single video clip or multiple video clips. This could be something as simple as shortening...
- Working With Adobe Premiere Pro's Basic 3d Video Effect Part 5
In the last part of this tutorial, we are going to add the spotlight effect that you may have noticed in the preview video from the first part of this exercise. Let's take another look. As the text tilts and swivels, you should see a glare that moves...
- Working With Adobe Premiere Pro's Basic 3d Video Effect Part 4
We will now be working with the Distance to Image property of the Basic 3D video effect. The higher the value that you assign to this property, the further away the image will appear. Make sure that the clip on the Timeline is still selected. And in the...
- Motion Effects: Keyframing The Rotation Property Part 3
Next, we will add a third keyframe. Starting from the second keyframe, we will set it so that the "rotate me" text will rotate three more times until it reaches the third keyframe. You will probably assume that you just need to input a value of 3x0.0...
- Motion Effects: Keyframing The Rotation Property Part 2
Make sure that the title clip on the Timeline is selected then go to the Effect Controls Panel. If you do not see the Effect Controls Panel, choose Window > Effect Controls from the main menu. Expand the Motion Category by clicking on the right-pointing...
Tutorials
Working with Adobe Premiere Pro's Basic 3D Video Effect PART 3
We will now be working with the Tilt property of the Basic 3D video effect. The Tilt property controls the clip's vertical rotation.
Make sure that the clip on the Timeline is still selected. Then go the the Effect Controls window and position the playhead on the same point as the third keyframe of the Swivel property. Then click on the Toggle Animation button beside the word Tilt to turn on keyframing for the Tilt property. Leave the Tilt values on this keyframe at 0 x 0.0.

Then move the playhead forward by about 1 second and add another keyframe. On this keyframe, change the angle value to 70.

Move the playhead forward again by about 1 second and add another keyframe. Let's make the text rotate vertically towards the opposite direction. In the previous keyframe, the angle was set to 70 degrees. If we input a lower value on this next keyframe, the clip will rotate towards the opposite direction. We can even input a negative value. So let's go ahead and do that. On this new keyframe, change the angle to -70. This will result in the text rotating in the opposite direction starting from the previous keyframe.

Let's add one last keyframe for the Tilt property. Position the playhead on the rightmost edge of the clip's timeline and add a keyframe. On this keyframe, change the tilt angle value back to zero.

At this point, when you watch your sequence on the program monitor, you should have something like this:
go back to Working with Adobe Premiere Pro's Basic 3D Video Effect PART 2
continue to Working with Adobe Premiere Pro's Basic 3D Video Effect PART 4
- Distance Learning - Cs175 A - Sem 01 Sy 2012-13
July 24, 2012 Today, we'll start with Adobe Premiere Pro CS5. This is Adobe's popular video editing software. Video editing is the process of making changes to a single video clip or multiple video clips. This could be something as simple as shortening...
- Working With Adobe Premiere Pro's Basic 3d Video Effect Part 5
In the last part of this tutorial, we are going to add the spotlight effect that you may have noticed in the preview video from the first part of this exercise. Let's take another look. As the text tilts and swivels, you should see a glare that moves...
- Working With Adobe Premiere Pro's Basic 3d Video Effect Part 4
We will now be working with the Distance to Image property of the Basic 3D video effect. The higher the value that you assign to this property, the further away the image will appear. Make sure that the clip on the Timeline is still selected. And in the...
- Motion Effects: Keyframing The Rotation Property Part 3
Next, we will add a third keyframe. Starting from the second keyframe, we will set it so that the "rotate me" text will rotate three more times until it reaches the third keyframe. You will probably assume that you just need to input a value of 3x0.0...
- Motion Effects: Keyframing The Rotation Property Part 2
Make sure that the title clip on the Timeline is selected then go to the Effect Controls Panel. If you do not see the Effect Controls Panel, choose Window > Effect Controls from the main menu. Expand the Motion Category by clicking on the right-pointing...
