Tutorials
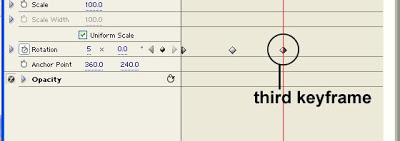
Next, we will add a third keyframe.
Starting from the second keyframe, we will set it so that the "rotate me" text will rotate three more times until it reaches the third keyframe. You will probably assume that you just need to input a value of 3x0.0 for the third keyframe. But that would be an incorrect assumption. Read on to find out why.
Make sure that the title clip on the Timeline is still selected and add another keyframe after the second keyframe. Position this third keyframe about 5 seconds away from the second keyframe. On this third keyframe, set the rotation value to 5x0.0. This will make the "rotate me" text rotate 3 more times starting from the second keyframe.

Now why does it rotate 3 times when a value of 5 was specified?
Remember that in the second keyframe, the rotation value is 2x0.0. To make the clip rotate 3 more times from that point until it reaches the third keyframe, we need to ADD a value of 3 to the previous value (which is 2). This is why we specified a value of 5x0.0 instead of just 3.
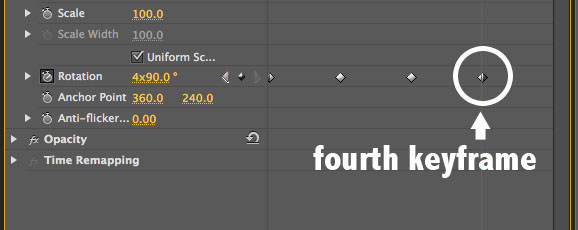
Next, we are going to add a fourth keyframe. From keyframe no. 3 to keyframe no. 4, we are going to set it so that the "rotate me" text rotates toward the OPPOSITE direction (so far the text has been rotating in a clockwise manner, so for this fourth keyframe, we will make the text rotate in a counterclockwise manner).
Make sure the title clip on the Timeline is still selected. Then in the Effect Controls Panel, add another keyframe about 5 seconds away from the third keyframe.
In order to make the clip rotate counterclockwise, we will need to specify a rotation value that is LOWER than the one in the previous keyframe. The rotation value in keyframe no. 3 is 5x0.0. So if you specify a lower value of 4x0.0 for keyframe no. 4, that would be a difference of 1. So that's going to make the clip do 1 full counterclockwise rotation. If you specify a value of 3x0.0, then that would make a difference of 2, so it's going to make 2 full counterclockwise rotations instead. For this specific keyframe, let's specify a value of 4x90.0. This will still have the effect of making the clip rotate counter-clockwise. However, instead of settling at an angle of 0.0 degrees, it's going to stop once it reaches 90.0 degrees. So it's actually not going to make a complete counterclockwise rotation all the way down to 0.0 degrees. Instead, once it reaches 90.0 degrees, it's going to stop.

Here's a summary of the values:
Keyframe no. 1 - 0.0
Keyframe no. 2 - 2x0.0
Keyframe no. 3 - 5x0.0
Keyframe no. 4 - 4x90.0
By now you should have something similar to the sample video shown at the beginning of this tutorial. Check to see if that is the case, and then experiment further using different values to test your understanding of the topic.
And that concludes this basic tutorial on keyframing a clip's rotation property.
go back to Motion Effects: Keyframing the Rotation Property PART 2
- Creating A Simple Volume Bar In Flash
In this tutorial, we'll learn how to create a simple volume bar in Flash. We'll create a rectangle that grows bigger or smaller whenever we click on the volume buttons. [VIEW SAMPLE FILE] Step 1 Use the rectangle tool to draw a vertical bar. This...
- Working With Adobe Premiere Pro's Basic 3d Video Effect Part 4
We will now be working with the Distance to Image property of the Basic 3D video effect. The higher the value that you assign to this property, the further away the image will appear. Make sure that the clip on the Timeline is still selected. And in the...
- Working With Adobe Premiere Pro's Basic 3d Video Effect Part 2
Next, we are going to apply the Basic 3D video effect to the title clip that was just placed on the Timeline. Go to the Effects window (choose Window > Effects from the main menu if you do not see it). You will find the Basic 3D video effect under Video...
- Motion Effects: Keyframing The Rotation Property Part 2
Make sure that the title clip on the Timeline is selected then go to the Effect Controls Panel. If you do not see the Effect Controls Panel, choose Window > Effect Controls from the main menu. Expand the Motion Category by clicking on the right-pointing...
- Motion Effects: Keyframing The Rotation Property Part 1
Level: Basic Software: Adobe Premiere Pro Version: 1.5 (UPDATED FOR CS5 - 2012-07-26) In this exercise, we will be learning how to use keyframes to animate the rotation property of a video clip. By the end of this tutorial, you should have something like...
Tutorials
Motion Effects: Keyframing the Rotation Property PART 3
Next, we will add a third keyframe.
Starting from the second keyframe, we will set it so that the "rotate me" text will rotate three more times until it reaches the third keyframe. You will probably assume that you just need to input a value of 3x0.0 for the third keyframe. But that would be an incorrect assumption. Read on to find out why.
Make sure that the title clip on the Timeline is still selected and add another keyframe after the second keyframe. Position this third keyframe about 5 seconds away from the second keyframe. On this third keyframe, set the rotation value to 5x0.0. This will make the "rotate me" text rotate 3 more times starting from the second keyframe.

Now why does it rotate 3 times when a value of 5 was specified?
Remember that in the second keyframe, the rotation value is 2x0.0. To make the clip rotate 3 more times from that point until it reaches the third keyframe, we need to ADD a value of 3 to the previous value (which is 2). This is why we specified a value of 5x0.0 instead of just 3.
Next, we are going to add a fourth keyframe. From keyframe no. 3 to keyframe no. 4, we are going to set it so that the "rotate me" text rotates toward the OPPOSITE direction (so far the text has been rotating in a clockwise manner, so for this fourth keyframe, we will make the text rotate in a counterclockwise manner).
Make sure the title clip on the Timeline is still selected. Then in the Effect Controls Panel, add another keyframe about 5 seconds away from the third keyframe.
In order to make the clip rotate counterclockwise, we will need to specify a rotation value that is LOWER than the one in the previous keyframe. The rotation value in keyframe no. 3 is 5x0.0. So if you specify a lower value of 4x0.0 for keyframe no. 4, that would be a difference of 1. So that's going to make the clip do 1 full counterclockwise rotation. If you specify a value of 3x0.0, then that would make a difference of 2, so it's going to make 2 full counterclockwise rotations instead. For this specific keyframe, let's specify a value of 4x90.0. This will still have the effect of making the clip rotate counter-clockwise. However, instead of settling at an angle of 0.0 degrees, it's going to stop once it reaches 90.0 degrees. So it's actually not going to make a complete counterclockwise rotation all the way down to 0.0 degrees. Instead, once it reaches 90.0 degrees, it's going to stop.

Here's a summary of the values:
Keyframe no. 1 - 0.0
Keyframe no. 2 - 2x0.0
Keyframe no. 3 - 5x0.0
Keyframe no. 4 - 4x90.0
By now you should have something similar to the sample video shown at the beginning of this tutorial. Check to see if that is the case, and then experiment further using different values to test your understanding of the topic.
And that concludes this basic tutorial on keyframing a clip's rotation property.
go back to Motion Effects: Keyframing the Rotation Property PART 2
- Creating A Simple Volume Bar In Flash
In this tutorial, we'll learn how to create a simple volume bar in Flash. We'll create a rectangle that grows bigger or smaller whenever we click on the volume buttons. [VIEW SAMPLE FILE] Step 1 Use the rectangle tool to draw a vertical bar. This...
- Working With Adobe Premiere Pro's Basic 3d Video Effect Part 4
We will now be working with the Distance to Image property of the Basic 3D video effect. The higher the value that you assign to this property, the further away the image will appear. Make sure that the clip on the Timeline is still selected. And in the...
- Working With Adobe Premiere Pro's Basic 3d Video Effect Part 2
Next, we are going to apply the Basic 3D video effect to the title clip that was just placed on the Timeline. Go to the Effects window (choose Window > Effects from the main menu if you do not see it). You will find the Basic 3D video effect under Video...
- Motion Effects: Keyframing The Rotation Property Part 2
Make sure that the title clip on the Timeline is selected then go to the Effect Controls Panel. If you do not see the Effect Controls Panel, choose Window > Effect Controls from the main menu. Expand the Motion Category by clicking on the right-pointing...
- Motion Effects: Keyframing The Rotation Property Part 1
Level: Basic Software: Adobe Premiere Pro Version: 1.5 (UPDATED FOR CS5 - 2012-07-26) In this exercise, we will be learning how to use keyframes to animate the rotation property of a video clip. By the end of this tutorial, you should have something like...
