Tutorials
Level: Basic
Software: Adobe Premiere Pro
Version: 1.5 (UPDATED FOR CS5 - 2012-07-26)
In this exercise, we will be learning how to use keyframes to animate the rotation property of a video clip.
By the end of this tutorial, you should have something like this:
Let's begin by creating a folder named Keyframe_Rotation. You may place this folder anywhere in your hard drive.
Next, create a new Adobe Premiere Pro CS5 Project. Save this inside the Keyframe_Rotation folder, and give the file the name Keyframe_Rotation as well. For the sequence, select the DV-NTSC Standard 32kHz Preset.
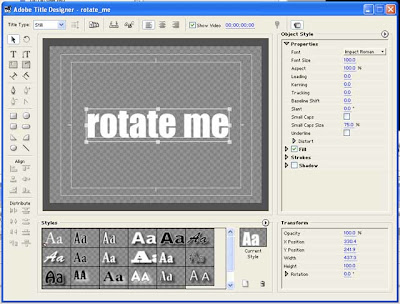
Next, create a new Title by choosing File > New > Title... Name this title rotate_me.
Using the Title designer's Type Tool, type in the words "rotate me" and place it somewhere along the center of your title. Once you've added the text, close the Title Designer window. There is no need to save the title. Premiere will automatically save it for you.
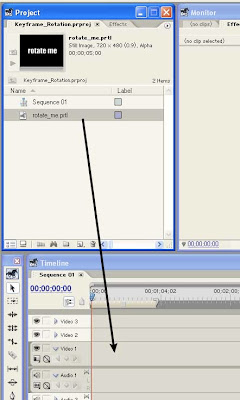
You should now see the rotate_me title in your project window.
From the Project window, drag the rotate_me title down to the video 1 track of your Timeline. You can zoom in on your Timeline in order to see the clip better.
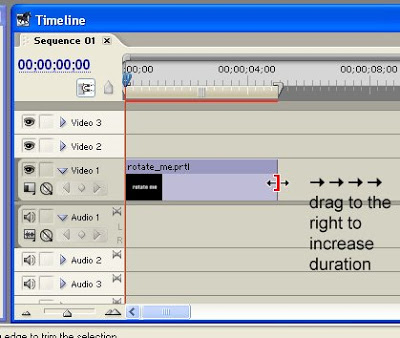
If the clip is less than 20 seconds, extend the clip's duration using the Selection Tool. Position the selection tool over the right edge of the title clip on the video 1 track until it turns into a red bracket icon with a double-headed arrow. Then click-and drag towards the right in order to extend the clip's duration. Increase the duration to about 20 seconds. It doesn't have to be exact. Just make sure it's around 20 seconds.
continue on to Motion Effects: Keyframing the Rotation Property PART 2
- Distance Learning - Cs175 A - Sem 01 Sy 2012-13
July 24, 2012 Today, we'll start with Adobe Premiere Pro CS5. This is Adobe's popular video editing software. Video editing is the process of making changes to a single video clip or multiple video clips. This could be something as simple as shortening...
- Working With Adobe Premiere Pro's Basic 3d Video Effect Part 4
We will now be working with the Distance to Image property of the Basic 3D video effect. The higher the value that you assign to this property, the further away the image will appear. Make sure that the clip on the Timeline is still selected. And in the...
- Working With Adobe Premiere Pro's Basic 3d Video Effect Part 2
Next, we are going to apply the Basic 3D video effect to the title clip that was just placed on the Timeline. Go to the Effects window (choose Window > Effects from the main menu if you do not see it). You will find the Basic 3D video effect under Video...
- Motion Effects: Keyframing The Rotation Property Part 3
Next, we will add a third keyframe. Starting from the second keyframe, we will set it so that the "rotate me" text will rotate three more times until it reaches the third keyframe. You will probably assume that you just need to input a value of 3x0.0...
- Motion Effects: Keyframing The Rotation Property Part 2
Make sure that the title clip on the Timeline is selected then go to the Effect Controls Panel. If you do not see the Effect Controls Panel, choose Window > Effect Controls from the main menu. Expand the Motion Category by clicking on the right-pointing...
Tutorials
Motion Effects: Keyframing the Rotation Property PART 1
Level: Basic
Software: Adobe Premiere Pro
Version: 1.5 (UPDATED FOR CS5 - 2012-07-26)
In this exercise, we will be learning how to use keyframes to animate the rotation property of a video clip.
By the end of this tutorial, you should have something like this:
Let's begin by creating a folder named Keyframe_Rotation. You may place this folder anywhere in your hard drive.
Next, create a new Adobe Premiere Pro CS5 Project. Save this inside the Keyframe_Rotation folder, and give the file the name Keyframe_Rotation as well. For the sequence, select the DV-NTSC Standard 32kHz Preset.
Next, create a new Title by choosing File > New > Title... Name this title rotate_me.
Using the Title designer's Type Tool, type in the words "rotate me" and place it somewhere along the center of your title. Once you've added the text, close the Title Designer window. There is no need to save the title. Premiere will automatically save it for you.
You should now see the rotate_me title in your project window.
From the Project window, drag the rotate_me title down to the video 1 track of your Timeline. You can zoom in on your Timeline in order to see the clip better.
If the clip is less than 20 seconds, extend the clip's duration using the Selection Tool. Position the selection tool over the right edge of the title clip on the video 1 track until it turns into a red bracket icon with a double-headed arrow. Then click-and drag towards the right in order to extend the clip's duration. Increase the duration to about 20 seconds. It doesn't have to be exact. Just make sure it's around 20 seconds.
continue on to Motion Effects: Keyframing the Rotation Property PART 2
- Distance Learning - Cs175 A - Sem 01 Sy 2012-13
July 24, 2012 Today, we'll start with Adobe Premiere Pro CS5. This is Adobe's popular video editing software. Video editing is the process of making changes to a single video clip or multiple video clips. This could be something as simple as shortening...
- Working With Adobe Premiere Pro's Basic 3d Video Effect Part 4
We will now be working with the Distance to Image property of the Basic 3D video effect. The higher the value that you assign to this property, the further away the image will appear. Make sure that the clip on the Timeline is still selected. And in the...
- Working With Adobe Premiere Pro's Basic 3d Video Effect Part 2
Next, we are going to apply the Basic 3D video effect to the title clip that was just placed on the Timeline. Go to the Effects window (choose Window > Effects from the main menu if you do not see it). You will find the Basic 3D video effect under Video...
- Motion Effects: Keyframing The Rotation Property Part 3
Next, we will add a third keyframe. Starting from the second keyframe, we will set it so that the "rotate me" text will rotate three more times until it reaches the third keyframe. You will probably assume that you just need to input a value of 3x0.0...
- Motion Effects: Keyframing The Rotation Property Part 2
Make sure that the title clip on the Timeline is selected then go to the Effect Controls Panel. If you do not see the Effect Controls Panel, choose Window > Effect Controls from the main menu. Expand the Motion Category by clicking on the right-pointing...