Tutorials
Make sure that the title clip on the Timeline is selected then go to the Effect Controls Panel. If you do not see the Effect Controls Panel, choose Window > Effect Controls from the main menu.
Expand the Motion Category by clicking on the right-pointing arrowhead beside the word Motion. Once expanded, you should see all the Fixed Motion Effects (Position, Scale, Rotation and Anchor Point). Make sure that you can see the clip's Timeline View as well. If you do not see it, click on the Show/Hide Timeline View Button.
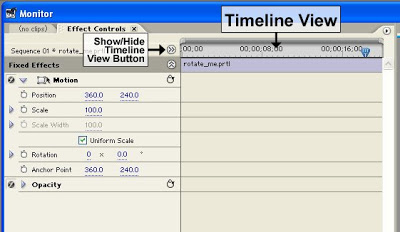
Note: If you are unable to click the Show/Hide Timeline View Button, you may need to extend the Effect Controls Panel's size. If it's docked inside the Monitor Window, try increasing the Monitor Window's length so that the length of the Effect Controls panel will increase accordingly as well. Or you can remove the Effect Controls Panel from the Monitor Window by clicking and dragging it out of the Monitor Window. Once it's out of the Monitor Window, increase the Effect Controls Panel's length and click on the Show/Hide Timeline View Button to reveal the selected clip's timeline.
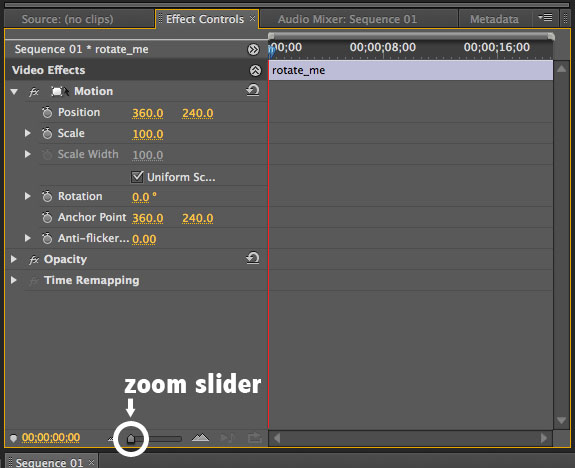
Also, make sure that the Effect Controls Panel's zoom slider is slid all the way to the left. That way, you'll see the entire length of the selected clip in the Timeline View.
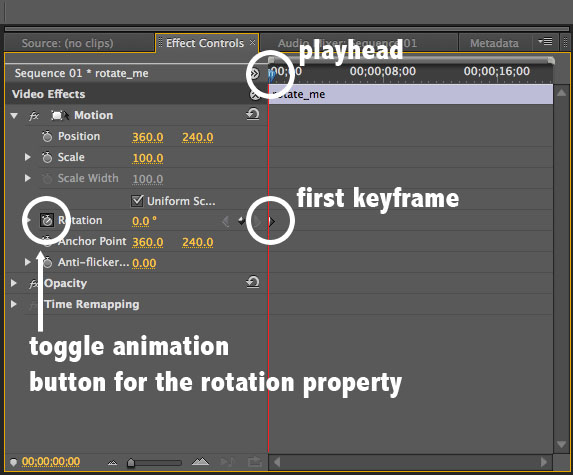
Let's now add the first keyframe. In the Effect Controls Panel's Timeline View, make sure that the playhead is at the leftmost edge. Then click on the Toggle Animation button beside the word Rotation. Activating the animation button will result in the first keyframe being automatically added. Keep the rotation value as it is (0.0). This means that you are starting at a 0.0 degree angle.
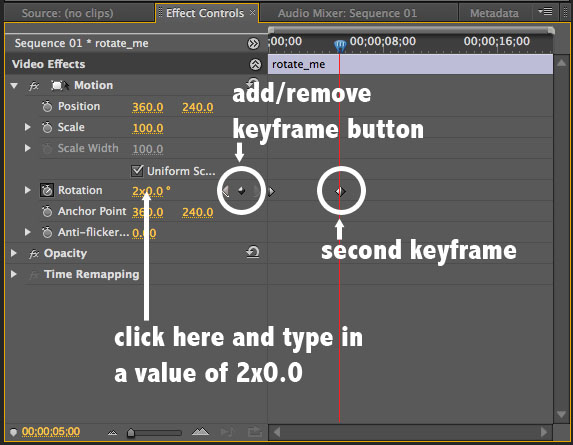
Next, while still in the Effect Controls Panel's Timeline View, move the playhead forward to about 5 seconds. It doesn't have to be exact. Then click on the Add/Remove Keyframe button to add another keyframe. On this keyframe, type in a rotation value of 2x0.0. Then hit enter to apply the value.
Move the playhead back to the beginning of the Timeline and click on the Program Monitor's Play button in order to preview your work. You should see the title clip make 2 full rotations.

In the first keyframe, the rotation value is set to 0.0 degrees. In the second keyframe, the rotation value is set to 2x0.0. This means that starting from the first keyframe, the clip will complete 2 full rotations, and settle at a 0.0 degree angle when it reaches the second keyframe. When you specified a value of 2x0.0, the first value (2) is for the number of rotations that you want to make, the second value (0.0) is for the angle that you want to settle at.
go back to Motion Effects: Keyframing the Rotation Property PART 1
continue on to Motion Effects: Keyframing the Rotation Property PART 3
- Working With Adobe Premiere Pro's Basic 3d Video Effect Part 5
In the last part of this tutorial, we are going to add the spotlight effect that you may have noticed in the preview video from the first part of this exercise. Let's take another look. As the text tilts and swivels, you should see a glare that moves...
- Working With Adobe Premiere Pro's Basic 3d Video Effect Part 4
We will now be working with the Distance to Image property of the Basic 3D video effect. The higher the value that you assign to this property, the further away the image will appear. Make sure that the clip on the Timeline is still selected. And in the...
- Working With Adobe Premiere Pro's Basic 3d Video Effect Part 3
We will now be working with the Tilt property of the Basic 3D video effect. The Tilt property controls the clip's vertical rotation. Make sure that the clip on the Timeline is still selected. Then go the the Effect Controls window and position the...
- Motion Effects: Keyframing The Rotation Property Part 3
Next, we will add a third keyframe. Starting from the second keyframe, we will set it so that the "rotate me" text will rotate three more times until it reaches the third keyframe. You will probably assume that you just need to input a value of 3x0.0...
- Motion Effects: Keyframing The Rotation Property Part 1
Level: Basic Software: Adobe Premiere Pro Version: 1.5 (UPDATED FOR CS5 - 2012-07-26) In this exercise, we will be learning how to use keyframes to animate the rotation property of a video clip. By the end of this tutorial, you should have something like...
Tutorials
Motion Effects: Keyframing the Rotation Property PART 2
Make sure that the title clip on the Timeline is selected then go to the Effect Controls Panel. If you do not see the Effect Controls Panel, choose Window > Effect Controls from the main menu.
Expand the Motion Category by clicking on the right-pointing arrowhead beside the word Motion. Once expanded, you should see all the Fixed Motion Effects (Position, Scale, Rotation and Anchor Point). Make sure that you can see the clip's Timeline View as well. If you do not see it, click on the Show/Hide Timeline View Button.
Note: If you are unable to click the Show/Hide Timeline View Button, you may need to extend the Effect Controls Panel's size. If it's docked inside the Monitor Window, try increasing the Monitor Window's length so that the length of the Effect Controls panel will increase accordingly as well. Or you can remove the Effect Controls Panel from the Monitor Window by clicking and dragging it out of the Monitor Window. Once it's out of the Monitor Window, increase the Effect Controls Panel's length and click on the Show/Hide Timeline View Button to reveal the selected clip's timeline.
Also, make sure that the Effect Controls Panel's zoom slider is slid all the way to the left. That way, you'll see the entire length of the selected clip in the Timeline View.
Let's now add the first keyframe. In the Effect Controls Panel's Timeline View, make sure that the playhead is at the leftmost edge. Then click on the Toggle Animation button beside the word Rotation. Activating the animation button will result in the first keyframe being automatically added. Keep the rotation value as it is (0.0). This means that you are starting at a 0.0 degree angle.
Next, while still in the Effect Controls Panel's Timeline View, move the playhead forward to about 5 seconds. It doesn't have to be exact. Then click on the Add/Remove Keyframe button to add another keyframe. On this keyframe, type in a rotation value of 2x0.0. Then hit enter to apply the value.
Move the playhead back to the beginning of the Timeline and click on the Program Monitor's Play button in order to preview your work. You should see the title clip make 2 full rotations.
In the first keyframe, the rotation value is set to 0.0 degrees. In the second keyframe, the rotation value is set to 2x0.0. This means that starting from the first keyframe, the clip will complete 2 full rotations, and settle at a 0.0 degree angle when it reaches the second keyframe. When you specified a value of 2x0.0, the first value (2) is for the number of rotations that you want to make, the second value (0.0) is for the angle that you want to settle at.
go back to Motion Effects: Keyframing the Rotation Property PART 1
continue on to Motion Effects: Keyframing the Rotation Property PART 3
- Working With Adobe Premiere Pro's Basic 3d Video Effect Part 5
In the last part of this tutorial, we are going to add the spotlight effect that you may have noticed in the preview video from the first part of this exercise. Let's take another look. As the text tilts and swivels, you should see a glare that moves...
- Working With Adobe Premiere Pro's Basic 3d Video Effect Part 4
We will now be working with the Distance to Image property of the Basic 3D video effect. The higher the value that you assign to this property, the further away the image will appear. Make sure that the clip on the Timeline is still selected. And in the...
- Working With Adobe Premiere Pro's Basic 3d Video Effect Part 3
We will now be working with the Tilt property of the Basic 3D video effect. The Tilt property controls the clip's vertical rotation. Make sure that the clip on the Timeline is still selected. Then go the the Effect Controls window and position the...
- Motion Effects: Keyframing The Rotation Property Part 3
Next, we will add a third keyframe. Starting from the second keyframe, we will set it so that the "rotate me" text will rotate three more times until it reaches the third keyframe. You will probably assume that you just need to input a value of 3x0.0...
- Motion Effects: Keyframing The Rotation Property Part 1
Level: Basic Software: Adobe Premiere Pro Version: 1.5 (UPDATED FOR CS5 - 2012-07-26) In this exercise, we will be learning how to use keyframes to animate the rotation property of a video clip. By the end of this tutorial, you should have something like...