Tutorials
In this basic Photoshop CS5 tutorial, we're going to learn how to use the Brush tool.
Step 1
Launch the Photoshop application.
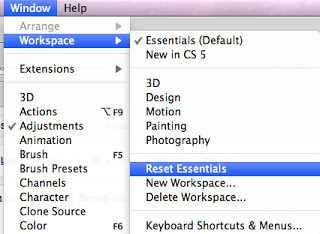
To ensure that your workspace will be more similar to the screenshots in this tutorial, go to the menu bar and choose Window > Workspace > Essentials.
 And then go back to Window > Workspace, and then choose Reset Essentials.
Step 2
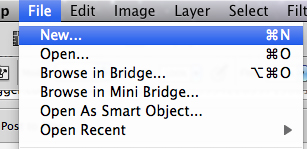
Create a new Photoshop document by choosing File > New.
Step 3
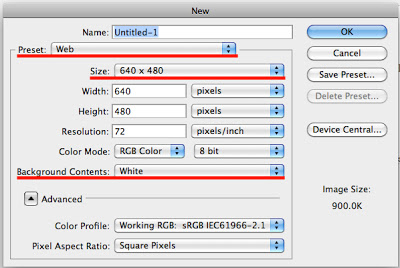
The New document window will come up. For the Preset, choose Web. For the Size, choose 640 x 480. For the Background Contents, choose White. Then click OK.
Step 4
You should now have a new Photoshop document.
Let's take a look at the Tools panel. This panel is usually found on the left side of the workspace. It is a panel composed of different icons that represent the different tools that you can use when editing your images in Photoshop.
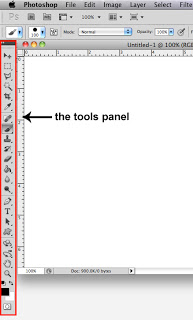 Look for the Brush tool. In a single-column Tools panel, the Brush tool is the 8th tool from the top, and is represented by a brush icon. This is how it looks like:
 If you see that same brush icon above, go ahead and click on it in order to select it.
If you can't find that brush icon in that spot, you might find one of these 3 icons in its place:
 If you see any of those 3 icons instead, then you'll need to click and hold on the icon in order to reveal a menu of more tools. Then choose the Brush tool from that list.
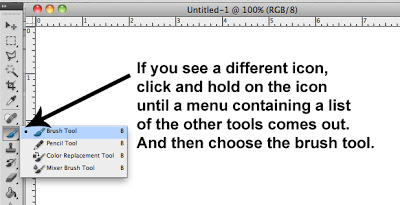 The Brush tool lets you paint inside your document.
Step 5
Before we start painting, let's choose a brush preset. Go to the Options bar, and open up the Brush Preset picker.
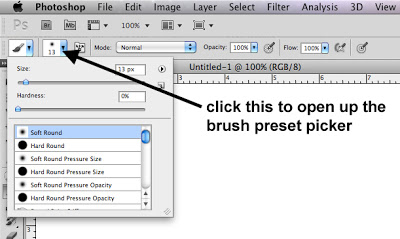 A brush preset is basically a combination of different options (such as size, shape, hardness, etc...) that will determine how your brush strokes will look like. Some presets create round brush strokes, other presets create spattered ones, others have softer edges, etc... There are many different brush presets that you can choose from, and you'll be able to see a list of these different presets when you open up the Brush Preset picker.
The preset list can be displayed in any of the following formats (you can click on the image below to enlarge):

Step 6
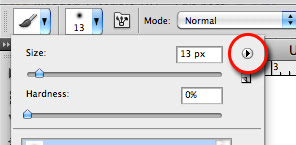
Let's go ahead and reset the preset list first. You can add, modify and delete presets. So over time, this preset list tends to start looking different from one Photoshop installation to another. What I have in my list, might be different from what you have. To reset the brush presets, click on the triangle in the upper-right corner of the Brush Preset picker. This will bring up a pop-up panel menu.
 Choose Reset Brushes from the pop-up panel menu.
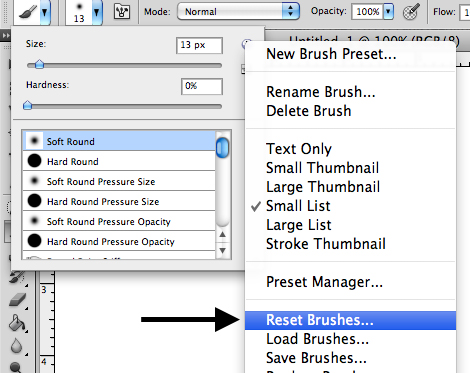 When you are asked to Replace current brushes with the default brushes, click OK.
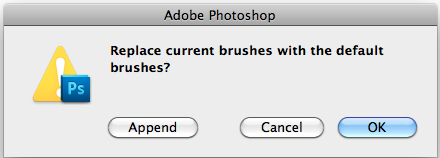 And then if you are also asked to Save changes to the current brushes before replacing them, choose Don't Save (if this question doesn't pop up, that's OK). After resetting the brushes, you might not even see a difference. This just means that your Brush Preset picker has not been altered before.
Step 7
Next, click on the triangle again, and choose Small List.
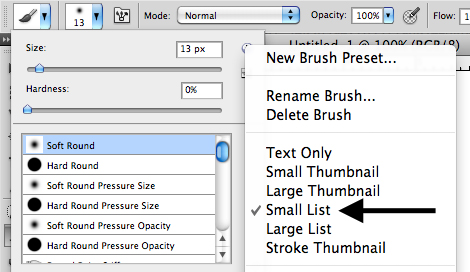 As I mentioned earlier, the preset list can be displayed in a few different formats. The Small List format is going to display the list of brush presets in such away that each preset is represented by a thumbnail, followed by the name of the preset. Displaying the name of the preset will give you a better idea of what the brush preset might look like. The image below highlights the brush preset list displayed in the Small List format.
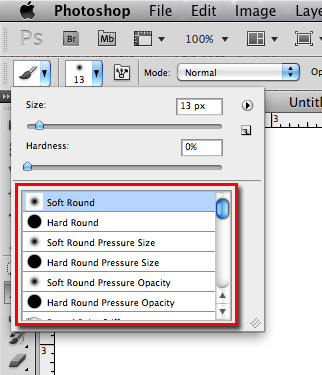 You have many different presets to choose from, and as I've mentioned before, each preset will change the way your brush strokes will look like.
Step 8
Let's choose the very first preset - the Soft Round preset. Just click on it in order to select it.
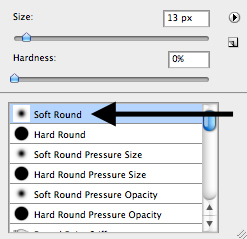 This preset creates a basic round brush that has blurry edges.
Step 9
Let's now choose a color for our brush. The color of the brush is determined by the foreground color that is chosen. To find out which color is chosen as the foreground color, go to the bottom of the Tools panel where you will find 2 color boxes. The color box on top shows the currently selected foreground color. The one below it shows the currently selected background color.
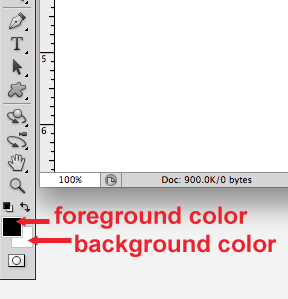 Whichever color is displayed in the foreground color box is the current color of your brush.
Step 10
If you want to change the color, one way of doing so is by going to the Swatches panel. If you're using the Essentials workspace layout, the Swatches panel can be found somewhere in the top-right corner of the workspace.
Click on the Swatches tab in order to bring up the panel. The Swatches panel contains a list of different colors that you can choose from. Simply click on your desired color in order to select it.
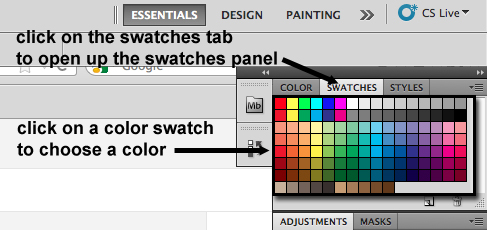 Once you've clicked on a new color, you should see the foreground color box in the Tools panel updated to reflect the new color that you chose.
Step 11
Next, go back to the Options bar to set a few more brush settings. Make sure that the Mode is set to Normal, and that the Opacity and Flow are set to 100%.

Step 12
Now, let's go ahead and start painting. Simply place your cursor inside the document window, and click and drag to make a brush stroke.
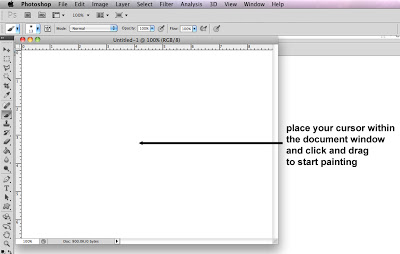 Try painting a few linear brush strokes first by clicking and dragging in a horizontal, vertical or diagonal fashion. Then try painting some shapes. For example, click and drag in a circular pattern to paint a circle.
Step 13
If you want to change the size of your brush, you can do so in the Brush Preset picker. Open it up and you can click and drag the Size slider. Drag to the right to increase the size, and drag to the left to decrease the size.
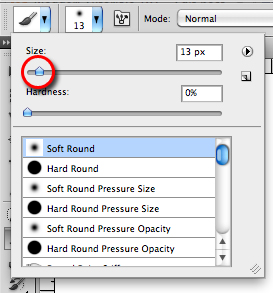 Or you can also input a specific value in the text field.
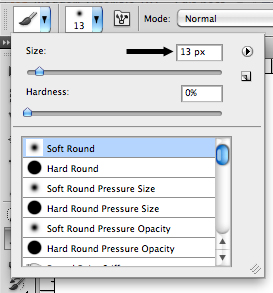 Just type in the desired value, and press enter on your keyboard to apply. The px unit stands for pixels, but there is no need to type that in. You can just type in the number without the px unit.
Step 14
The Hardness slider allows you to adjust how soft or how hard you want the edges of your brush to be. You can apply a value anywhere from 0 to 100 percent.
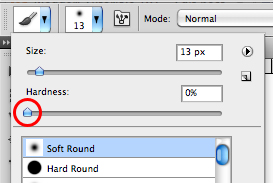 A lower value makes your brush softer. When you say softer, it means that the edges of the brush strokes are more blurry. As you increase the value, the softness will decrease. Try painting with different hardness values to see the difference.
Step 15
If you want to erase some of your brush strokes, you can use the Eraser tool, which can also be found in the Tools panel.
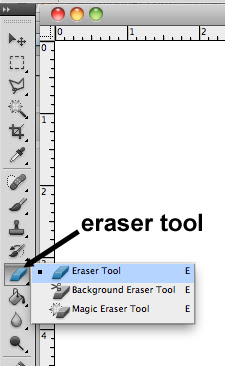 Be sure to select the Eraser tool, and not the Background Eraser or Magic Eraser tool. Just like the brush tool icon in the Tools panel, you can click and hold on the eraser icons to reveal a list of the other erasers.
Step 16
Like the brush tool, the eraser tool also has some available presets. To use a simple eraser, go to the Options bar, and choose the Hard Round preset. For Mode, choose Brush, and set the Opacity and Flow to 100%. Also make sure that Erase to History is unchecked.
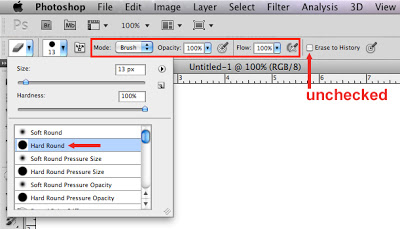 Then just start clicking and dragging over the areas that you want to erase.
And that concludes this basic Photoshop CS5 tutorial on how to use the Brush tool. Try painting some kind of scenery or a more complex object so that you can practice what you just learned. Use different colors and brush presets.
- Tutorial - How To Make A Text Watermark
Step by step instructions for adding a watermark to your photos Watermark Tutorial at Growing Up a NJ Wife Blog "Today's Photo Tips lesson is going to teach everyone how to create a quick brush preset for easy watermarking. You should ALWAYS...
- Learning Photoshop - Tutorials For Beginners
Hello, and welcome to my page - Learning Photoshop - Tutorials for Beginners. If you're new to Photoshop, then this is a good place to start. Here, you'll find a collection of the different Photoshop tutorials I've made to help you get started...
- Flash Cs4 Drawing Tools
The following tools highlighted in the picture below can be used to draw things on the stage of your Flash CS4 document: The tools highlighted in the image are (clockwise): Pen tool, Line tool, Rectangle tool, Deco tool, Brush tool and Pencil tool Some...
- Photoshop Retouching Tools: Clone Stamp, Healing Brush, Spot Healing Brush, Patch Tool
This video by IceFlowStudios on YouTube talks about 4 different Photoshop tools that can be used to retouch images: the Clone Stamp, the Spot Healing Brush, the Healing Brush and the Patch tool. I would just like to add a few things regarding some of...
- Working With Adobe Premiere Pro's Basic 3d Video Effect Part 1
Level: Basic Software: Adobe Premiere Pro Version: 1.5 In this tutorial we will learn how to use Adobe Premiere Pro's Basic 3D video effect. Here's a sample video file that shows what we hope to achieve by the end of this exercise: Let's...
Tutorials
Using the Brush tool - Photoshop CS5 Tutorial
In this basic Photoshop CS5 tutorial, we're going to learn how to use the Brush tool.
Step 1
Launch the Photoshop application.
To ensure that your workspace will be more similar to the screenshots in this tutorial, go to the menu bar and choose Window > Workspace > Essentials.


Step 2
Create a new Photoshop document by choosing File > New.

Step 3
The New document window will come up. For the Preset, choose Web. For the Size, choose 640 x 480. For the Background Contents, choose White. Then click OK.

Step 4
You should now have a new Photoshop document.
Let's take a look at the Tools panel. This panel is usually found on the left side of the workspace. It is a panel composed of different icons that represent the different tools that you can use when editing your images in Photoshop.


If you can't find that brush icon in that spot, you might find one of these 3 icons in its place:


Step 5
Before we start painting, let's choose a brush preset. Go to the Options bar, and open up the Brush Preset picker.

The preset list can be displayed in any of the following formats (you can click on the image below to enlarge):

Step 6
Let's go ahead and reset the preset list first. You can add, modify and delete presets. So over time, this preset list tends to start looking different from one Photoshop installation to another. What I have in my list, might be different from what you have. To reset the brush presets, click on the triangle in the upper-right corner of the Brush Preset picker. This will bring up a pop-up panel menu.


Step 7
Next, click on the triangle again, and choose Small List.


Step 8
Let's choose the very first preset - the Soft Round preset. Just click on it in order to select it.

Step 9
Let's now choose a color for our brush. The color of the brush is determined by the foreground color that is chosen. To find out which color is chosen as the foreground color, go to the bottom of the Tools panel where you will find 2 color boxes. The color box on top shows the currently selected foreground color. The one below it shows the currently selected background color.

Step 10
If you want to change the color, one way of doing so is by going to the Swatches panel. If you're using the Essentials workspace layout, the Swatches panel can be found somewhere in the top-right corner of the workspace.
Click on the Swatches tab in order to bring up the panel. The Swatches panel contains a list of different colors that you can choose from. Simply click on your desired color in order to select it.

Step 11
Next, go back to the Options bar to set a few more brush settings. Make sure that the Mode is set to Normal, and that the Opacity and Flow are set to 100%.

Step 12
Now, let's go ahead and start painting. Simply place your cursor inside the document window, and click and drag to make a brush stroke.

Step 13
If you want to change the size of your brush, you can do so in the Brush Preset picker. Open it up and you can click and drag the Size slider. Drag to the right to increase the size, and drag to the left to decrease the size.


Step 14
The Hardness slider allows you to adjust how soft or how hard you want the edges of your brush to be. You can apply a value anywhere from 0 to 100 percent.

Step 15
If you want to erase some of your brush strokes, you can use the Eraser tool, which can also be found in the Tools panel.

Step 16
Like the brush tool, the eraser tool also has some available presets. To use a simple eraser, go to the Options bar, and choose the Hard Round preset. For Mode, choose Brush, and set the Opacity and Flow to 100%. Also make sure that Erase to History is unchecked.

And that concludes this basic Photoshop CS5 tutorial on how to use the Brush tool. Try painting some kind of scenery or a more complex object so that you can practice what you just learned. Use different colors and brush presets.
- Tutorial - How To Make A Text Watermark
Step by step instructions for adding a watermark to your photos Watermark Tutorial at Growing Up a NJ Wife Blog "Today's Photo Tips lesson is going to teach everyone how to create a quick brush preset for easy watermarking. You should ALWAYS...
- Learning Photoshop - Tutorials For Beginners
Hello, and welcome to my page - Learning Photoshop - Tutorials for Beginners. If you're new to Photoshop, then this is a good place to start. Here, you'll find a collection of the different Photoshop tutorials I've made to help you get started...
- Flash Cs4 Drawing Tools
The following tools highlighted in the picture below can be used to draw things on the stage of your Flash CS4 document: The tools highlighted in the image are (clockwise): Pen tool, Line tool, Rectangle tool, Deco tool, Brush tool and Pencil tool Some...
- Photoshop Retouching Tools: Clone Stamp, Healing Brush, Spot Healing Brush, Patch Tool
This video by IceFlowStudios on YouTube talks about 4 different Photoshop tools that can be used to retouch images: the Clone Stamp, the Spot Healing Brush, the Healing Brush and the Patch tool. I would just like to add a few things regarding some of...
- Working With Adobe Premiere Pro's Basic 3d Video Effect Part 1
Level: Basic Software: Adobe Premiere Pro Version: 1.5 In this tutorial we will learn how to use Adobe Premiere Pro's Basic 3D video effect. Here's a sample video file that shows what we hope to achieve by the end of this exercise: Let's...
