Tutorials
In this tutorial, we're going to learn all about layers in Photoshop.
What is a layer?
In Photoshop, a layer is like a transparent sheet of paper that you can draw on. You can draw on a small portion of the layer, or completely fill it up. If you draw only on a small portion of the layer, then the rest of the layer remains transparent until you draw on those other portions as well.
What makes layers such a great feature in Photoshop is that you can work with many different layers all within one document. To better understand why this is such an important feature, let's take a look at an example. Let's say you have 5 transparent sheets of paper, and then you start drawing something on each of those sheets. On one sheet, you've drawn some clouds. On another sheet, you've drawn a sun. On another sheet, you've drawn some waves. On another, you've drawn a ship. And on another sheet, you just filled it up entirely with a solid color. In the images below, we can see how each of those sheets look like.
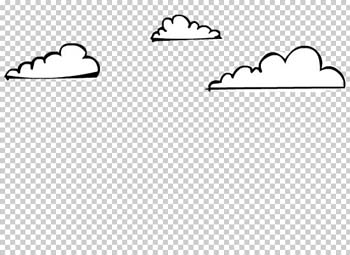

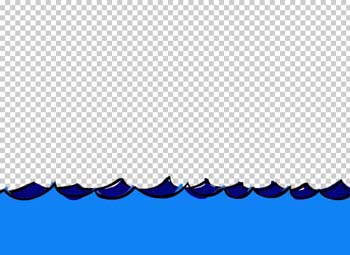
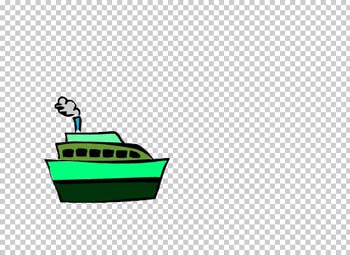
 The checkered pattern that you see in the first 4 images represent the areas of each sheet that are still transparent or empty. As you can see, it's only the last image that is completely filled up.
Individually, each layer can be considered a separate image. But as layers, we can stack them on top of each other to form a new image, as seen below:
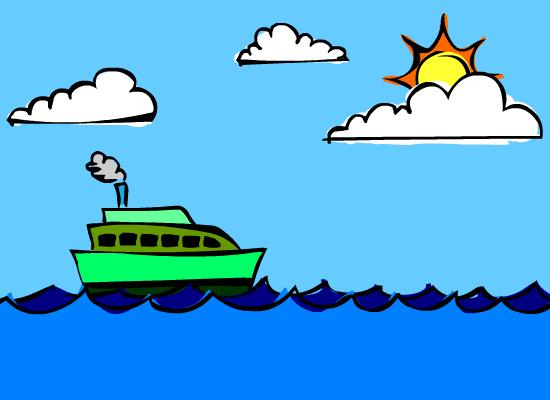 The ability of layers to retain their transparent areas allows you to put them on top of each other so that the lower layers can still be seen through the transparent areas of the layers on top. This gives the illusion that everything exists in just one sheet, but in reality, the different elements in the drawing are contained separately.
Let's go ahead and start learning how to work with layers in Photoshop.
STEP 1
Launch the Photoshop application.
To ensure that your workspace will be more similar to the screenshots in this tutorial, go to the menu bar and choose Window > Workspace > Essentials. And then go back to Window > Workspace, and then choose Reset Essentials.
STEP 2
Create a new Photoshop document by choosing File > New.
The create new document window will come up. For the Preset, choose Web. For the Size, choose 640 x 480. For the Background Contents, choose Transparent. Then click OK.
STEP 3
You should now have a new empty document with a transparent background.
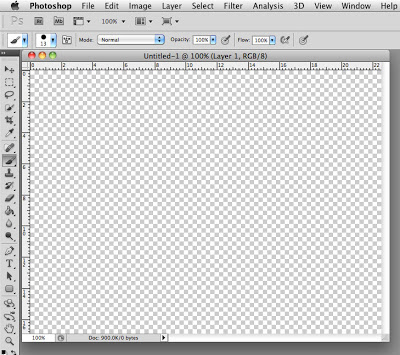 In the image above, you see that the new document is filled up with a checkered pattern. The checkered pattern represents the areas of your document that are empty or transparent. It does NOT show up when you print the document. Since we haven't placed or drawn anything in the document yet, then everything is still transparent, which is why the whole area is covered in this checkered pattern.
What if I don't see this checkered pattern?
First, if you go back to step 2, it says that for the Background Contents, you should have chosen Transparent. If you missed that step, then just create another document with all the settings stated in step 2.
If you did choose Transparent for the Background Contents, but you still don't see the checkered pattern, then it could be just a matter of setting some different Transparency preferences.
To edit the Transparency preferences:
If you are on a PC, go to the menu bar and choose Edit > Preferences > Transparency and Gamut. If you are on a Mac, go to the menu bar and choose Photoshop > Preferences > Transparency and Gamut.
This will bring up the Transparency and Gamut preferences. For the Grid Size, choose either Small, Medium or Large. Do NOT choose None. This will do the opposite of what we want. We want to display the checkered pattern, not hide it. I prefer a medium sized grid. Then for the Grid Colors, choose any of the available color schemes. This will determine the colors that the checkered pattern will have. I usually just go with the Light option.
 And then click OK.
Is having the checkered pattern a requirement when you work with layers?
No. It's not a requirement. You can still work with layers even if you have preferences that do not show this checkered pattern. Personally, I prefer seeing the checkered pattern so I can more easily tell which areas of my canvas are still transparent or empty.
STEP 4
How do we work with layers?
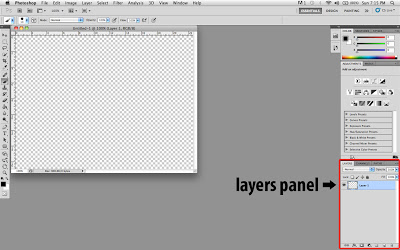
In Photoshop, there is a specific panel that allows us to work with and manage the layers of our document. This panel is called the Layers panel.
If you've chosen the Small Screen workspace layout, the Layers panel can be found in the lower right area of the workspace.
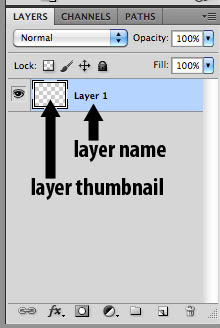
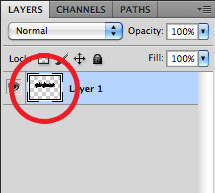
 Let's take a closer look. You'll see that your document already has one layer with a generic name of Layer 1. Right beside the name is the layer thumbnail. The layer thumbnail contains a tiny preview of what is inside the layer. Since our layer is empty, the layer thumbnail is empty as well (as represented by the checkered pattern)
STEP 5
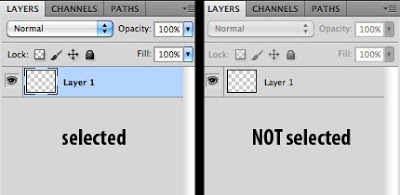
Before we start painting on this layer, let's make sure that it's selected. In Photoshop, you always have to make sure that the layer is selected before you can start working with it.
To select a layer, you simply click on it. Right now, Layer 1 is probably already selected, but go ahead and click on it just to be sure. You can click on the layer thumbnail, the name, or even the empty area after the name. Just don't click on the eye icon to the left of the layer thumbnail. We'll talk about that eye icon later on.
You'll know that a layer is selected if it's highlighted.
STEP 6
Now that we have our layer selected, let's go ahead and paint on it. In the toolbar, select the brush tool. In the Brush Preset picker, choose the Hard Round brush preset. Then in the Swatches panel, choose the color black. Then go to the document window and start making random brush strokes similar to what you see in the image below.
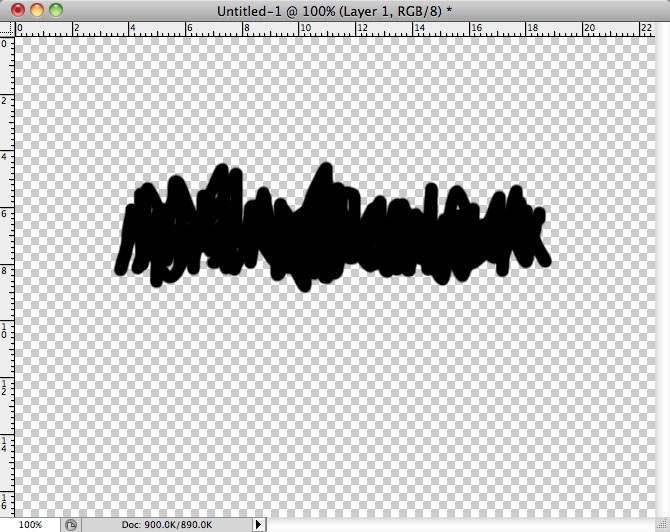 Then go back to the Layers panel and look at the layer thumbnail. You should see that the layer thumbnail has now been updated to reflect what you just painted on your layer.
STEP 7
Let's now add a new layer. To add a new layer, go to the bottom of the Layers panel and click on the Create a new layer button.
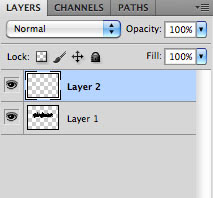
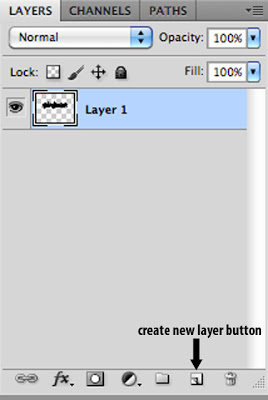 After clicking on the button, you should now see a new layer on top of Layer 1. This new layer will have a generic name of Layer 2.
STEP 8
Before we start painting on this new layer, let's make sure that it's selected. It should probably be selected already, because by default, new layers that you create are automatically selected. But to be sure, just click on Layer 2 in the Layers panel in order to select it.
It's very important to be mindful of which layer is currently selected. Because as I've mentioned earlier, you must select a layer first if you want to be able to work on it. It's quite easy to forget which layer is currently selected especially if you're working with a lot of layers. Because of this, you might end up painting or editing the wrong layer. So make it a habit to double-check which layer is currently selected in your Layers panel.
STEP 9
Now that Layer 2 is selected, go to the Swatches panel and select a red color for your brush. Then go to the canvas and start adding more random brush strokes on top of the black paint that we already have.
 Since Layer 2 is the currently selected layer, these new red brush strokes that you've painted were placed in Layer 2. The black paint is still on Layer 1.
STEP 10
Let's create one more layer. Another way of creating a new layer is by using a keyboard shortcut. Press ctrl + shift + N if you're on a PC or command + shift + N if you're on a Mac. This will bring up the New Layer window.
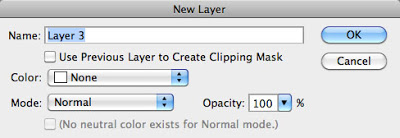 Just click OK to create your new layer right away.
You should now have a new layer with a generic name of Layer 3.
STEP 11
Make sure that Layer 3 is selected. Then choose a blue color for your brush, and start painting some more random brush strokes similar to what you see in the image below.
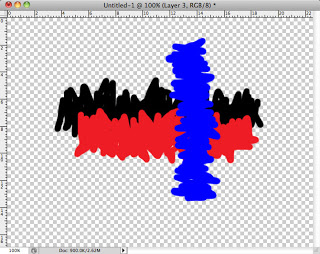 Since Layer 3 is the currently selected layer, these new blue brush strokes that you've painted were placed in Layer 3. The black paint is still on Layer 1. And the red paint is on Layer 2.
STEP 12
So now we have 3 layers and each layer has been painted on - black on Layer 1, red on Layer 2, and blue on Layer 3. We could have painted everything in just one layer, but that would not give us the benefits that are associated with working with multiple layers. When you work with layers, each layer can be edited separately. For example, you can erase some parts of one layer without affecting the contents of the other layers. Let's go ahead and try that.
Go to the tools panel and select the eraser tool. But don't erase anything just yet.
STEP 13
Before you start erasing, make sure that Layer 2 is selected. Go to the Layers panel and click on Layer 2 in order to select it.
STEP 14
Now that Layer 2 is selected, this means that when we start erasing, it's only going to affect the contents of Layer 2. Let's erase a small portion of the paint in Layer 2 that intersects with the contents of the other layers.
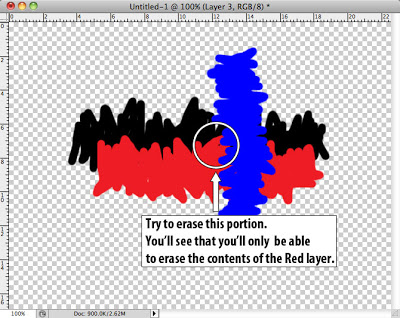 You'll see that the only thing that gets erased are the contents of Layer 2, which in this case are the red brush strokes. The other layers remain untouched. Here, we clearly see that we can edit layers independently. This is a great feature to have if you want to be able to erase portions of one layer without affecting the others.
Remember! If you want to edit and make changes to a specific layer, then make sure that you select the correct layer in the Layers panel.
RENAMING LAYERS
By default, layers will have generic names (Layer 1, Layer 2, Layer 3, etc...). But you can rename layers if you want to. Let's go ahead and rename our layers.
STEP 1
Go to the Layers panel and position your cursor on top of the Layer 1 name. Then double-click on the Layer 1 name. You have to double-click on the name itself.
STEP 2
You'll see the name turn into an editable text field.
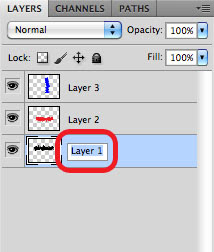 You can now type in a new name. Let's name this one Black since we painted black brush strokes on it, and then hit enter. The Layer 1 name should now be changed to Black.
STEP 3
Go ahead and rename the other layers as well. Change Layer 2 to Red and Layer 3 to Blue. It's a good idea to make the layer names descriptive of what they contain. That way, it'll be easier for you to find the layer that you want to work on.
CHANGING THE ORDER OF LAYERS
In our current document, the Blue layer (formerly Layer 3) is at the top of the stack. This is why its contents appear at the very front.
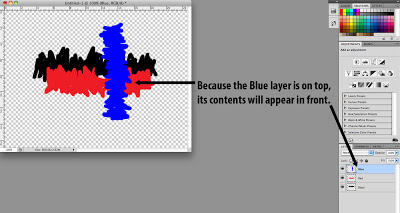 The stacking order of the layers in the Layers panel is very important. The contents of the layers that are higher on the stack will appear in front of the contents of the lower layers. So in our current example, the contents of the Blue layer are in front, followed by the contents of the Red layer behind it, and finally, the contents of the Black layer are at the very back.
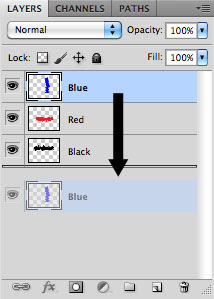
If you want to rearrange the layers, you can easily do so by clicking and dragging the layers in the Layers panel. Let's demonstrate this by moving the Blue layer from the top of the stack down to the bottom of the stack.
STEP 1
Go to the Layers panel and click and drag the Blue layer down until it's below the Black layer.
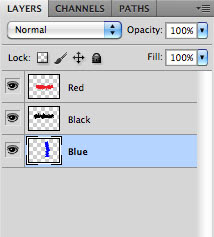
 Then release the mouse. You should now see that the Blue layer has been moved to the bottom of the stack.
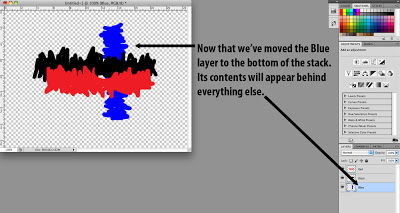
 And if you look at the canvas, you'll see that the contents of the Blue layer are now at the very back as well.
 Reordering layers is a fairly simple task. Just click and drag a layer upward or downward to move it higher or lower in the stack.
HIDING LAYERS
Sometimes, you might want to hide some layers because you're not sure whether you want to include them in your finished product. You can delete the layers, but because you're still unsure if you want to keep them or not, hiding them temporarily would a better option. You can toggle the visibility of a layer by clicking on the eye icon on the left side of the layer.
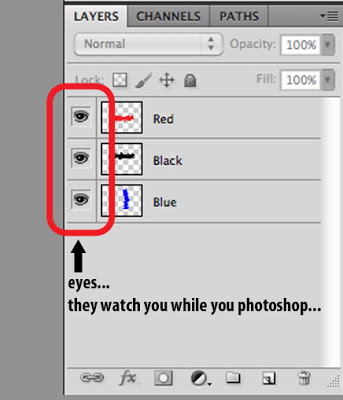 If the eye icon is present, it means that the layer is visible. If the eye is not there, then that means the layer is invisible.
STEP 1
Click on the eye icon of the Red layer.
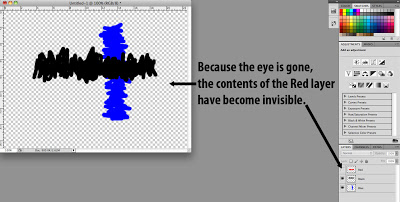
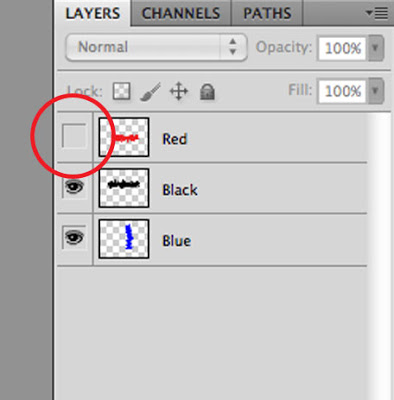
 After clicking on it, you should see the eye icon disappear. This means that the Red layer is no longer visible. If you look at the canvas, you'll see that the contents of the Red layer can no longer be seen.
STEP 2
To bring back the layer's visibility, click on the box where the eye used to be.
 This will bring back the eye icon and return the layer's visibility.
DUPLICATING LAYERS
If you want to make extra copies of a layer, you can easily duplicate it in the Layers panel. Let's try making a duplicate of the Red layer, so make sure that the layer is visible again.
STEP 1
Go to the Layers panel and select the Red Layer.
STEP 2
If you're on a PC, press ctrl + j on your keyboard. If you're on a Mac, press command + j. That is the keyboard shortcut for duplicating the currently selected layer.
STEP 3
Take a look at your Layers panel, you should now see another layer named Red copy. That is the duplicate layer that you just created.
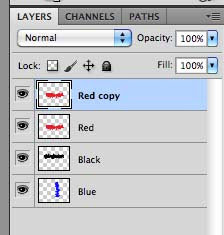 But if you look at your document window, you'll see that nothing has changed. It doesn't look like we've created a duplicate of the Red layer.
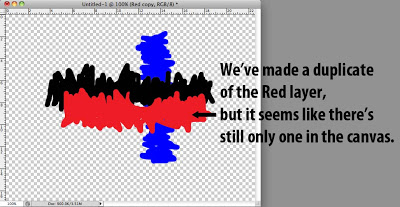 That's because the duplicate is on exactly the same spot as the original one. So it's actually covering the original. What we can do is move the contents of the Red copy layer to a different location.
STEP 4
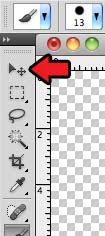
To move the Red copy layer, we can use the Move tool.
 First, make sure that the Red copy layer is selected. Then go to toolbar and select the Move tool.
 Then in the document window, click and drag the contents of the Red copy layer to a new location.
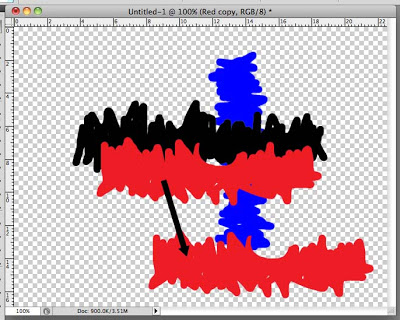 Now you see that you really do have a duplicate of the Red layer.
Reminder: When moving the contents of a layer using the Move tool, make sure that you've selected the correct layer in the Layers panel.
DELETING LAYERS
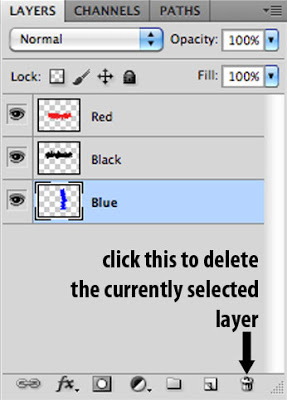
To delete a layer, go to the Layers panel and select the layer that you would like to delete. Then click on the trash can icon at the bottom of the layers panel.
What we've learned here is just a small portion of what can be done with the use of layers. For beginners, I suggest that you start making a habit of working with multiple layers. Always be mindful of which layer is currently selected. If you have a complex Photoshop project that has lots of layers, the chances of working with the wrong layer increase. For example, you might end up painting on one layer when you really meant to paint on another layer. Working with multiple layers might get a little tedious, but it does offer far more benefits because it gives you greater control over the different elements of your Photoshop composition by allowing you to edit each layer individually.
And that concludes this tutorial on working with layers.
- Tutorial - How To Make A Tiered Skirt
A simple project that sews up easily in a few hours Tiered Skirt Tutorial at Peanut Life Adventures Blog "First, measure how long you want your skirt to be and add 3 inches (1 for the hem and 2 for the elastic casing). All layers will be 45 inches...
- Learning Photoshop - Tutorials For Beginners
Hello, and welcome to my page - Learning Photoshop - Tutorials for Beginners. If you're new to Photoshop, then this is a good place to start. Here, you'll find a collection of the different Photoshop tutorials I've made to help you get started...
- Photoshop Clipping Mask Tutorial (cs5)
If you know how layer masks work, then you'll understand how clipping masks work as well. Just like a layer mask, a clipping mask allows you to hide portions of a layer. The difference is that a layer mask is a part of the actual layer that you want...
- Creating A Layer Mask - Photoshop Tutorial (cs5)
A layer mask is a great feature in Photoshop that lets you hide portions of a layer. Let's say that you want to remove some parts of your image - such as the background, for example. Instead of using the eraser tool to erase the background, you can...
- The Free Transform / Transform Commands - Photoshop Cs5 Tutorial
The Free Transform / Transform commands let you make transformation changes to the contents of a layer. These changes include - scaling, rotating, skewing, and flipping. STEP 1 To transform the contents of a layer, you must first select the layer in the...
Tutorials
Working with Layers - Photoshop CS5 Tutorial
In this tutorial, we're going to learn all about layers in Photoshop.
What is a layer?
In Photoshop, a layer is like a transparent sheet of paper that you can draw on. You can draw on a small portion of the layer, or completely fill it up. If you draw only on a small portion of the layer, then the rest of the layer remains transparent until you draw on those other portions as well.
What makes layers such a great feature in Photoshop is that you can work with many different layers all within one document. To better understand why this is such an important feature, let's take a look at an example. Let's say you have 5 transparent sheets of paper, and then you start drawing something on each of those sheets. On one sheet, you've drawn some clouds. On another sheet, you've drawn a sun. On another sheet, you've drawn some waves. On another, you've drawn a ship. And on another sheet, you just filled it up entirely with a solid color. In the images below, we can see how each of those sheets look like.
Individually, each layer can be considered a separate image. But as layers, we can stack them on top of each other to form a new image, as seen below:
Let's go ahead and start learning how to work with layers in Photoshop.
STEP 1
Launch the Photoshop application.
To ensure that your workspace will be more similar to the screenshots in this tutorial, go to the menu bar and choose Window > Workspace > Essentials. And then go back to Window > Workspace, and then choose Reset Essentials.
STEP 2
Create a new Photoshop document by choosing File > New.
The create new document window will come up. For the Preset, choose Web. For the Size, choose 640 x 480. For the Background Contents, choose Transparent. Then click OK.
STEP 3
You should now have a new empty document with a transparent background.
What if I don't see this checkered pattern?
First, if you go back to step 2, it says that for the Background Contents, you should have chosen Transparent. If you missed that step, then just create another document with all the settings stated in step 2.
If you did choose Transparent for the Background Contents, but you still don't see the checkered pattern, then it could be just a matter of setting some different Transparency preferences.
To edit the Transparency preferences:
If you are on a PC, go to the menu bar and choose Edit > Preferences > Transparency and Gamut. If you are on a Mac, go to the menu bar and choose Photoshop > Preferences > Transparency and Gamut.
This will bring up the Transparency and Gamut preferences. For the Grid Size, choose either Small, Medium or Large. Do NOT choose None. This will do the opposite of what we want. We want to display the checkered pattern, not hide it. I prefer a medium sized grid. Then for the Grid Colors, choose any of the available color schemes. This will determine the colors that the checkered pattern will have. I usually just go with the Light option.
Is having the checkered pattern a requirement when you work with layers?
No. It's not a requirement. You can still work with layers even if you have preferences that do not show this checkered pattern. Personally, I prefer seeing the checkered pattern so I can more easily tell which areas of my canvas are still transparent or empty.
STEP 4
How do we work with layers?
In Photoshop, there is a specific panel that allows us to work with and manage the layers of our document. This panel is called the Layers panel.
If you've chosen the Small Screen workspace layout, the Layers panel can be found in the lower right area of the workspace.
STEP 5
Before we start painting on this layer, let's make sure that it's selected. In Photoshop, you always have to make sure that the layer is selected before you can start working with it.
To select a layer, you simply click on it. Right now, Layer 1 is probably already selected, but go ahead and click on it just to be sure. You can click on the layer thumbnail, the name, or even the empty area after the name. Just don't click on the eye icon to the left of the layer thumbnail. We'll talk about that eye icon later on.
You'll know that a layer is selected if it's highlighted.
STEP 6
Now that we have our layer selected, let's go ahead and paint on it. In the toolbar, select the brush tool. In the Brush Preset picker, choose the Hard Round brush preset. Then in the Swatches panel, choose the color black. Then go to the document window and start making random brush strokes similar to what you see in the image below.
STEP 7
Let's now add a new layer. To add a new layer, go to the bottom of the Layers panel and click on the Create a new layer button.
STEP 8
Before we start painting on this new layer, let's make sure that it's selected. It should probably be selected already, because by default, new layers that you create are automatically selected. But to be sure, just click on Layer 2 in the Layers panel in order to select it.
It's very important to be mindful of which layer is currently selected. Because as I've mentioned earlier, you must select a layer first if you want to be able to work on it. It's quite easy to forget which layer is currently selected especially if you're working with a lot of layers. Because of this, you might end up painting or editing the wrong layer. So make it a habit to double-check which layer is currently selected in your Layers panel.
STEP 9
Now that Layer 2 is selected, go to the Swatches panel and select a red color for your brush. Then go to the canvas and start adding more random brush strokes on top of the black paint that we already have.
STEP 10
Let's create one more layer. Another way of creating a new layer is by using a keyboard shortcut. Press ctrl + shift + N if you're on a PC or command + shift + N if you're on a Mac. This will bring up the New Layer window.
You should now have a new layer with a generic name of Layer 3.
STEP 11
Make sure that Layer 3 is selected. Then choose a blue color for your brush, and start painting some more random brush strokes similar to what you see in the image below.
STEP 12
So now we have 3 layers and each layer has been painted on - black on Layer 1, red on Layer 2, and blue on Layer 3. We could have painted everything in just one layer, but that would not give us the benefits that are associated with working with multiple layers. When you work with layers, each layer can be edited separately. For example, you can erase some parts of one layer without affecting the contents of the other layers. Let's go ahead and try that.
Go to the tools panel and select the eraser tool. But don't erase anything just yet.
STEP 13
Before you start erasing, make sure that Layer 2 is selected. Go to the Layers panel and click on Layer 2 in order to select it.
STEP 14
Now that Layer 2 is selected, this means that when we start erasing, it's only going to affect the contents of Layer 2. Let's erase a small portion of the paint in Layer 2 that intersects with the contents of the other layers.
Remember! If you want to edit and make changes to a specific layer, then make sure that you select the correct layer in the Layers panel.
RENAMING LAYERS
By default, layers will have generic names (Layer 1, Layer 2, Layer 3, etc...). But you can rename layers if you want to. Let's go ahead and rename our layers.
STEP 1
Go to the Layers panel and position your cursor on top of the Layer 1 name. Then double-click on the Layer 1 name. You have to double-click on the name itself.
STEP 2
You'll see the name turn into an editable text field.
STEP 3
Go ahead and rename the other layers as well. Change Layer 2 to Red and Layer 3 to Blue. It's a good idea to make the layer names descriptive of what they contain. That way, it'll be easier for you to find the layer that you want to work on.
CHANGING THE ORDER OF LAYERS
In our current document, the Blue layer (formerly Layer 3) is at the top of the stack. This is why its contents appear at the very front.
If you want to rearrange the layers, you can easily do so by clicking and dragging the layers in the Layers panel. Let's demonstrate this by moving the Blue layer from the top of the stack down to the bottom of the stack.
STEP 1
Go to the Layers panel and click and drag the Blue layer down until it's below the Black layer.
HIDING LAYERS
Sometimes, you might want to hide some layers because you're not sure whether you want to include them in your finished product. You can delete the layers, but because you're still unsure if you want to keep them or not, hiding them temporarily would a better option. You can toggle the visibility of a layer by clicking on the eye icon on the left side of the layer.
STEP 1
Click on the eye icon of the Red layer.
STEP 2
To bring back the layer's visibility, click on the box where the eye used to be.
DUPLICATING LAYERS
If you want to make extra copies of a layer, you can easily duplicate it in the Layers panel. Let's try making a duplicate of the Red layer, so make sure that the layer is visible again.
STEP 1
Go to the Layers panel and select the Red Layer.
STEP 2
If you're on a PC, press ctrl + j on your keyboard. If you're on a Mac, press command + j. That is the keyboard shortcut for duplicating the currently selected layer.
STEP 3
Take a look at your Layers panel, you should now see another layer named Red copy. That is the duplicate layer that you just created.
STEP 4
To move the Red copy layer, we can use the Move tool.
Reminder: When moving the contents of a layer using the Move tool, make sure that you've selected the correct layer in the Layers panel.
DELETING LAYERS
To delete a layer, go to the Layers panel and select the layer that you would like to delete. Then click on the trash can icon at the bottom of the layers panel.
What we've learned here is just a small portion of what can be done with the use of layers. For beginners, I suggest that you start making a habit of working with multiple layers. Always be mindful of which layer is currently selected. If you have a complex Photoshop project that has lots of layers, the chances of working with the wrong layer increase. For example, you might end up painting on one layer when you really meant to paint on another layer. Working with multiple layers might get a little tedious, but it does offer far more benefits because it gives you greater control over the different elements of your Photoshop composition by allowing you to edit each layer individually.
And that concludes this tutorial on working with layers.
- Tutorial - How To Make A Tiered Skirt
A simple project that sews up easily in a few hours Tiered Skirt Tutorial at Peanut Life Adventures Blog "First, measure how long you want your skirt to be and add 3 inches (1 for the hem and 2 for the elastic casing). All layers will be 45 inches...
- Learning Photoshop - Tutorials For Beginners
Hello, and welcome to my page - Learning Photoshop - Tutorials for Beginners. If you're new to Photoshop, then this is a good place to start. Here, you'll find a collection of the different Photoshop tutorials I've made to help you get started...
- Photoshop Clipping Mask Tutorial (cs5)
If you know how layer masks work, then you'll understand how clipping masks work as well. Just like a layer mask, a clipping mask allows you to hide portions of a layer. The difference is that a layer mask is a part of the actual layer that you want...
- Creating A Layer Mask - Photoshop Tutorial (cs5)
A layer mask is a great feature in Photoshop that lets you hide portions of a layer. Let's say that you want to remove some parts of your image - such as the background, for example. Instead of using the eraser tool to erase the background, you can...
- The Free Transform / Transform Commands - Photoshop Cs5 Tutorial
The Free Transform / Transform commands let you make transformation changes to the contents of a layer. These changes include - scaling, rotating, skewing, and flipping. STEP 1 To transform the contents of a layer, you must first select the layer in the...